Learning how to build a chicken coop empowers you to create a safe and cozy environment for your poultry, ensuring their health and productivity. Proper planning and construction are essential to provide adequate space, ventilation, and protection from predators, all tailored to your flock’s needs. This comprehensive guide walks you through every step, from selecting the ideal location to finalizing interior features, so you can confidently undertake your coop-building project.
By understanding key design considerations, gathering suitable materials, following precise construction procedures, and implementing effective security measures, you can develop a durable and eco-friendly coop. Additionally, incorporating sustainable practices and ensuring ease of maintenance will keep your poultry happy and your setup efficient for years to come.
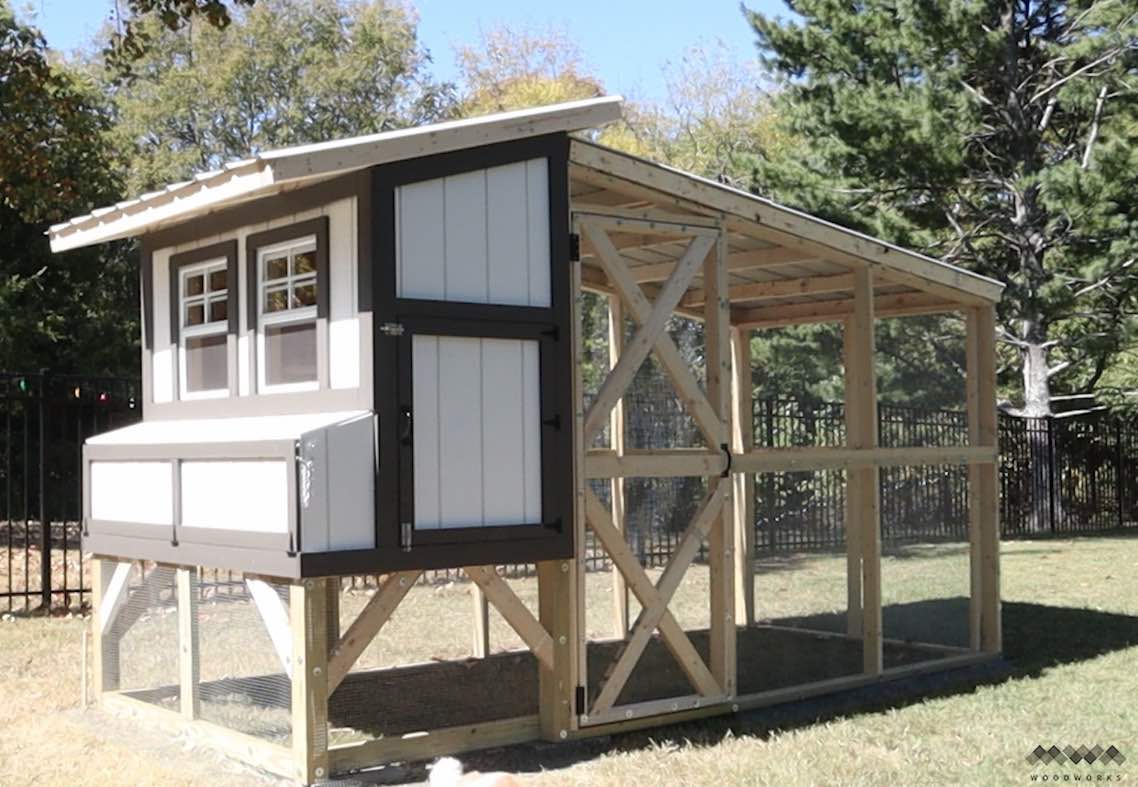
Planning the Chicken Coop Design
 - Whole Made Living")
Effective planning is essential to creating a functional and comfortable environment for your flock. Thoughtful selection of the coop location, size, and features ensures the health, safety, and productivity of your chickens. An optimal design considers environmental factors, space requirements, and practical features that make maintenance easier and the poultry’s well-being a priority.
By paying careful attention to these aspects, you can establish a coop that not only meets your chickens’ needs but also fits seamlessly into your property, ensuring long-term sustainability and ease of management.
Choosing the Optimal Location for the Coop
The placement of your chicken coop significantly influences the health and safety of your flock. Several environmental considerations guide the selection of an ideal site, including sunlight exposure, wind protection, and predator safety.
- Sunlight: Position the coop where it can receive ample natural light, particularly morning sunlight, which promotes egg production and helps keep the coop dry. Avoid areas shaded by large trees or structures that block sunlight during most of the day.
- Wind Protection: Locate the coop in a sheltered area shielded from strong prevailing winds. Natural windbreaks such as shrubs, fences, or terrain features can reduce wind chill, especially in colder climates.
- Predator Safety: Ensure the site is free from burrowing predators and that the location minimizes access points for animals such as raccoons, foxes, or neighbors’ dogs. Elevated sites or enclosed yards can enhance protection.
Strategic site selection enhances thermal regulation, prevents drafts, and minimizes predator intrusion, creating a safe environment for your chickens to thrive.
Determining the Appropriate Size of the Coop
Proper sizing of the chicken coop is crucial for maintaining flock health and reducing stress. The amount of space required varies based on the number of chickens and their activity needs.
As a general guideline, allocate a minimum of 2 to 3 square feet per chicken inside the coop and 8 to 10 square feet per bird in the outdoor run. Larger breeds or more active chickens necessitate more space to prevent overcrowding.
- Calculate your flock size, including potential future additions, to plan expandability.
- Estimate the indoor space by multiplying the number of chickens by the recommended square footage per bird.
- Design the outdoor run to provide ample space for foraging, exercise, and dust bathing activities.
- Ensure the coop height allows comfortable movement for cleaning and access, typically 4 feet or more.
For example, a flock of six standard-sized hens would require a coop of at least 12 to 18 square feet indoors, with an outdoor run of roughly 48 to 60 square feet for free movement.
Organizing Key Design Features
Incorporating essential features into your coop design improves functionality, hygiene, and comfort for your chickens. The following table illustrates different styles, sizes, and materials commonly used, helping you identify suitable options for your needs.
| Coop Style | Size (sq ft) | Materials | Key Features |
|---|---|---|---|
| A-Frame Coop | 6-12 | Wood, metal roofing | Nesting boxes, roost bars, ventilation windows, easy access for cleaning |
| Traditional Wooden Coop | 10-30 | Pressure-treated wood, plywood | Multiple nesting boxes, elevated roosts, ample ventilation, predator-proof latch |
| Portable Coop (Chicken Tractor) | 8-20 | Lightweight wood, wire mesh | Mobility for pasture rotation, integrated run, easy cleaning access |
| Modern Modular Coop | 20-50 | Composite materials, metal framing | Customizable sections, automatic ventilation, integrated lighting, nesting compartments |
Key features to include in any coop are essential for maintaining a healthy environment. These include:
- Nesting Boxes: Provide private and comfortable spaces for hens to lay eggs, typically one box per 3-4 hens.
- Roosts: Elevated perches for chickens to sleep safely at night, which promote good foot health and comfort.
- Ventilation: Adequate airflow minimizes moisture buildup and reduces the risk of respiratory diseases. Use adjustable windows or vents for control.
- Easy Access for Cleaning: Design doors and removable panels that allow straightforward cleaning and maintenance without disturbing the flock.
Gathering Materials and Tools for Construction
Building a sturdy and functional chicken coop requires careful selection of materials and the right tools for assembly. Selecting appropriate resources ensures the durability, safety, and efficiency of the construction process, regardless of the climate or budget constraints. Proper planning in this phase contributes significantly to the longevity and maintenance ease of the coop, providing a comfortable environment for your flock while optimizing resource use.A comprehensive understanding of suitable materials and necessary tools facilitates smooth construction and ensures that the coop withstands local weather conditions.
Considering eco-friendly and sustainable options can also reduce environmental impact and promote responsible building practices. Comparing different material options based on durability and cost assists in making informed decisions that align with your specific needs.
Materials for Building the Chicken Coop
Choosing high-quality, appropriate materials is fundamental to creating a secure and weather-resistant coop. The selection varies depending on climate, budget, and personal preferences, but some essentials remain consistent for all setups:
- Lumber: Treated pine, cedar, and composite wood are popular choices. Treated pine offers affordability but may contain chemicals, whereas cedar is naturally resistant to rot and insects. Composite wood is durable and low-maintenance but usually costs more.
- Wire Mesh: Hardware cloth (preferably galvanized) provides secure, predator-proof fencing. Mesh size should be small enough (1/2 inch or less) to prevent predator entry and protect smaller flock members.
- Roofing Materials: Options include asphalt shingles, metal panels, or waterproof membrane systems, each differing in durability, cost, and ease of installation. Metal roofs are highly durable and excellent for wet climates, while asphalt shingles are more budget-friendly.
- Foundation and Floor: Concrete slabs, pressure-treated wood, or compacted gravel are common options, with concrete offering longevity and stability, especially in damp environments.
- Insulation and Ventilation: Foam boards, straw bags, or natural fiber insulation can help regulate temperature, especially in colder climates.
Tools and Equipment Needed for Construction
Equipping oneself with the right tools ensures efficient and safe assembly of the chicken coop. The essential tools include:
- Power Tools: Cordless drill, circular saw, jigsaw, and angle grinder for cutting, drilling, and shaping materials efficiently.
- Hand Tools: Hammer, screwdrivers, pliers, tape measure, level, and square for precise measurement and assembly.
- Safety Equipment: Safety goggles, gloves, ear protection, and dust masks to ensure safety during construction.
- Additional Equipment: Staple gun for attaching wire mesh, wheelbarrow for transporting materials, and ladders for reaching elevated sections.
Eco-friendly and Sustainable Building Options
Sustainable building practices not only benefit the environment but can also result in cost savings over time. Incorporating eco-friendly materials and methods can make your chicken coop more sustainable:
- Reclaimed or Recycled Wood: Using salvaged wood reduces demand for new timber and minimizes waste.
- Natural and Non-toxic Paints and Sealants: Ensures safety for poultry and reduces chemical exposure.
- Solar Lighting and Solar-Powered Ventilation: Promotes renewable energy use and reduces electricity costs.
- Locally Sourced Materials: Minimizes transportation emissions and supports local economies.
- Wood from FSC-Certified Sources: Ensures sustainable forest management practices.
Comparison of Building Materials
Understanding the strengths and weaknesses of various materials helps in selecting the most suitable options for your coop:
| Material | Durability | Cost | Climate Suitability | Additional Notes |
|---|---|---|---|---|
| Treated Pine | Moderate; resistant to rot with chemical treatment | Affordable | Suitable for most climates but chemical treatment may be a concern for some | |
| Cedar | High; naturally resistant to rot and insects | Higher cost | Excellent in wet or humid climates | |
| Composite Wood | Very high; rot and insect resistant | Higher initial investment | Suitable for all climates, low maintenance | |
| Galvanized Hardware Mesh | High; resistant to rust and predators | Moderate | Ideal for predator-proof fencing in all climates | |
| Asphalt Shingles | Moderate; lifespan of 15-30 years | Economical | Suitable for typical climates, less ideal in extreme weather | |
| Metal Roofing | Very high; lifespan over 50 years | Higher upfront cost | Excellent for harsh weather and wet climates |
Step-by-Step Construction Procedures
Constructing a sturdy and functional chicken coop requires careful execution of each construction phase, from laying the foundation to installing essential features like doors and ventilation systems. Following a structured process ensures the coop is durable, safe for the chickens, and suitable for your specific environment. The steps Artikeld below provide a comprehensive guide to systematically building a reliable chicken coop that will serve your flock for years to come.
Adherence to these detailed procedures will help you avoid common pitfalls, ensure safety standards, and optimize the coop’s lifespan and functionality. Proper sequencing—from preparing the foundation to completing the finishing touches—enables smooth progress and facilitates troubleshooting during construction. Each step is crucial in creating a healthy, secure, and comfortable environment for your chickens.
Laying the Foundation
The foundation provides the structural base for the entire coop, preventing moisture ingress, pests, and ensuring stability. A well-laid foundation is vital to prevent shifting or settling that could compromise the integrity of the structure over time.
| Materials Used | Quantity & Specifications |
|---|---|
| Concrete mix | 3 cubic meters (for footing and slab) |
| Gravel | 0.5 cubic meters (for drainage base) |
| Reinforcing steel bars (rebar) | 8 mm diameter, approximately 50 meters |
| Wooden formwork | Suitable for 10 cm thick slab perimeter |
| Vapor barrier (plastic sheeting) | 1.5 meters wide, enough to cover the entire area |
- Mark the layout of the coop foundation on the ground, ensuring the dimensions match your design plans.
- Excavate the marked area to a depth of at least 15 cm, removing any loose soil or debris.
- Install a layer of gravel at the bottom to promote drainage, compacting it evenly.
- Construct wooden formwork around the perimeter, ensuring it is level and securely anchored.
- Lay the vapor barrier over the gravel to prevent moisture seepage into the concrete.
- Place reinforcement steel bars in a grid pattern within the formwork, maintaining proper spacing (~20 cm apart).
- Mix the concrete according to manufacturer instructions and pour it into the formwork, spreading evenly and consolidating to eliminate air pockets.
- Allow the concrete to cure for at least 7 days before proceeding to framing.
Framing and Wall Assembly
The framing provides the skeleton of the chicken coop, supporting the walls, roof, and doors. Proper framing ensures structural stability, ease of installation of walls and windows, and overall durability.
| Materials Used | Quantity & Specifications |
|---|---|
| Lumber (wooden studs) | 2” x 4” pressure-treated wood, approximately 30 pieces of 3 meters each |
| Top and bottom plates | Same as above, cut to length based on wall dimensions |
| Nails or screws | 3-inch nails or 2.5-inch wood screws, sufficient for assembly |
| Bracing elements | Diagonal braces made from 2” x 4” lumber, quantity depending on size |
- Construct the base frame on the concrete slab using pressure-treated lumber, anchoring it securely with anchors or bolts.
- Install vertical studs at 40–60 cm intervals along the perimeter, securing them to the base frame with nails or screws.
- Attach top and bottom plates to the vertical studs, ensuring all corners are square through measurements and diagonal checks.
- Add diagonal bracing between studs to reinforce the structure, especially for larger coop sizes or windy locations.
- Ensure all connections are tight and level; reinforce with additional nails or screws as needed.
Installing Windows, Doors, and Ventilation Systems
Proper installation of windows, doors, and ventilation features is essential for maintaining airflow, light, and security within the chicken coop. These features should be designed to promote a healthy environment and facilitate ease of access for maintenance and egg collection.
| Materials Used | Quantity & Specifications |
|---|---|
| Windows | 10 cm x 30 cm, double-glazed or clear acrylic panes |
| Door panels | Pressure-treated lumber or metal, dimensions matching opening |
| Ventilation systems | Adjustable vents or louvered openings, approximately 15 cm x 20 cm each |
| Screen mesh (for ventilation) | Fine galvanized steel mesh, sufficient for all ventilation openings |
| Sealants and weatherstripping | Appropriate for outdoor use, to prevent drafts and water ingress |
- Cut openings for windows and doors according to your design plans, ensuring they are level and securely framed with additional lumber if necessary.
- Install the window panes or acrylic sheets, sealing around the edges with weatherproof sealant to prevent leaks and drafts.
- Attach doors to the framing using hinges, ensuring they swing freely and latch securely.
- Design and install ventilation systems such as adjustable vents or louvered openings, positioning them high on the walls to facilitate airflow and prevent drafts at chicken level.
- Cover ventilation openings with galvanized mesh to prevent predator entry while allowing fresh air circulation.
- Apply weatherstripping around door and window frames to enhance insulation and prevent water or wind intrusion.
Installing Interior Features for Chickens

Creating a comfortable and functional interior space within your chicken coop is essential for the health, productivity, and well-being of your flock. Proper placement and design of key features such as nesting boxes, roosting bars, and feeding stations can significantly enhance their quality of life. Additionally, adequate insulation and weatherproofing are crucial to protect your chickens from extreme temperatures and harsh weather conditions.
Customizing these features to suit different breeds and flock sizes ensures that your coop remains efficient and welcoming for all your chickens.
In this section, we will explore the best practices for installing interior features that promote safety, comfort, and ease of maintenance, while also considering customization options to accommodate various flock requirements.
Building and Positioning Nesting Boxes, Roosting Bars, and Feeding Stations
Proper placement and design of interior features are vital for encouraging natural behaviors and maintaining cleanliness within the coop. Nesting boxes should be positioned in quiet, dimly lit corners to reduce stress, with a recommended ratio of one box for every three to four hens to prevent bullying and competition. Roosting bars should be installed at a height that allows chickens to perch comfortably, ideally 2-4 feet above the ground, with enough space between bars to prevent crowding.
Feeding stations should be located in easily accessible areas, away from nesting sites, to minimize contamination and spillage.
When constructing these features, use durable, non-toxic materials that are easy to clean. For nesting boxes, wooden compartments with removable bedding are ideal. Roosting bars can be made from smooth, rounded wood or metal that minimizes injury risk. Feeding stations should incorporate spill-proof feeders and waterers that facilitate quick refilling and sanitation.
Adding Insulation and Weatherproofing
Ensuring the interior of the coop maintains a stable temperature is crucial for chicken health, especially in regions with extreme climates. Insulation materials such as foam boards, fiberglass batts, or natural options like straw or hay can be installed within walls, ceilings, and floors to retain heat during winter and keep the coop cool in summer. Weatherproofing involves sealing gaps around windows and doors with weatherstripping or caulking to prevent drafts, moisture ingress, and pests.
Implementing proper ventilation alongside insulation prevents moisture buildup, reducing the risk of respiratory issues and mold. Consider adding weather-resistant paint or sealants to the interior surfaces to enhance durability and ease of cleaning. A well-insulated, weatherproofed interior creates a safe, cozy environment that promotes the overall health and productivity of your flock.
Customizing Interior Features for Different Breeds and Flock Sizes
Different chicken breeds and flock sizes benefit from tailored interior designs that accommodate their specific needs. For example, larger breeds like Brahmas require more spacious nesting boxes and higher perches to prevent overcrowding and injury. Smaller or more fragile breeds, such as Silkies, prefer lower perches and softer bedding to reduce stress and injury risks.
For larger flocks, increasing the number of nesting boxes and feeders can prevent competition and reduce stress. Adjustable features, such as removable partitions in nesting areas or modular roosts, allow for flexible configuration as the flock grows or changes. Consider the behavior patterns of your breeds—more active breeds may need more space and enrichment, while calmer breeds might require fewer perches and simpler layouts.
Implementing these customizations ensures that each chicken’s comfort and safety are prioritized, leading to healthier, more productive flocks.
Best Practices for Cleaning and Maintaining Interior Features
Maintaining a clean and sanitary coop environment is essential for preventing disease and ensuring longevity of interior features. Regularly inspect and clean nesting boxes, roosting bars, and feeding stations to remove manure, old bedding, and debris. Use appropriate disinfectants that are safe for birds and ensure thorough rinsing and drying after cleaning.
Establish a routine cleaning schedule—weekly or bi-weekly—depending on flock size and activity levels. Replace bedding in nesting boxes as needed, ideally after every few laying cycles, to maintain hygiene and encourage hens to lay in designated areas. Check for wear and damage in roosting bars and replace or repair components to prevent injuries. Keep feeding and watering stations sanitation clear, ensuring they are free from mold, algae, and pests.
Proper maintenance not only extends the lifespan of interior features but also creates a healthier environment, reducing the risk of illness and promoting the overall well-being of your chickens.
Securing and Protecting the Coop
Ensuring the safety and security of your chicken coop is essential for protecting your flock from predators and pests. While constructing a sturdy structure forms the foundation, implementing appropriate security measures significantly reduces the risk of unwanted intrusions. Thoughtful reinforcement and strategic barriers not only safeguard your chickens but also contribute to a stress-free and hygienic environment, allowing your flock to thrive with peace of mind.A well-designed security system integrates seamlessly with the overall coop aesthetics while providing maximum protection.
From fencing to access point barriers, each element plays a crucial role in creating an impenetrable barrier against predators. Properly securing doors, vents, and other access points further minimizes vulnerabilities, ensuring that predators such as raccoons, foxes, or rats cannot exploit weak spots. Employing a combination of sturdy materials, effective locking mechanisms, and strategic placement will help keep your poultry safe and secure under all circumstances.
Reinforcing the Structure Against Predators
To effectively guard your chicken coop from predators, reinforcement begins with robust fencing made from high-quality, predator-proof materials. Hardware cloth with small mesh sizes (1/2 inch or less) is highly recommended, as it prevents raccoons, weasels, and snakes from squeezing through. Installing fencing at a depth of 12-18 inches underground acts as a barrier against burrowing pests like rats and foxes, preventing them from tunneling into the coop.Locking mechanisms must be sturdy and predator-resistant; padlocks with keyed entry or slide bolts secured with lockable latches are ideal.
Overhead barriers such as roof extensions or electric fencing can deter climbing animals. Additionally, barriers like natural hedges or electric wires placed strategically around the perimeter further enhance security.
Securing Doors, Vents, and Access Points
Access points are common vulnerabilities in coop design, requiring careful attention to predator-proofing. Doors should be equipped with heavy-duty, lockable latches that are difficult for animals to tamper with or force open. Installing automatic or weighted doors that close securely after entry or exit can minimize accidental openings. Vents and windows should be covered with predator-proof screens or wire mesh, ensuring adequate ventilation without compromising security.
Using sturdy, lockable covers or latches on vents prevents predators from entering through these openings.To address potential weak spots, reinforce hinges with tamper-proof screws and add overlapping barriers to access points to prevent predators from prying them open. Regular inspections and maintenance are crucial to identify and repair any vulnerabilities promptly.
Preventive Measures to Minimize Pest and Predator Risks
Implementing proactive strategies greatly reduces the likelihood of pest and predator intrusion. The following measures are vital for maintaining a secure environment:
- Regularly inspect and repair fencing and barriers to address wear, damage, or corrosion.
- Ensure all access points are locked and secured, especially during nighttime or when the coop is unoccupied.
- Keep the surrounding area clear of debris, brush, and tall grass that could provide cover for predators.
- Utilize motion-activated lights or alarms around the coop perimeter as deterrents.
- Store feed and poultry supplies in predator-proof containers to avoid attracting pests.
- Maintain good sanitation by removing spilled feed and waste, which can attract rodents and insects.
- Elevate nesting boxes and perches to reduce ground access for predators and pests.
Effective predator-proofing combines physical barriers with vigilant maintenance and environmental management, creating a secure sanctuary for your chickens.
Integrating Security Features Seamlessly with Coop Design
The integration of security elements into the coop’s design ensures both functionality and aesthetic appeal. When planning the structure, select materials that complement the existing design while offering durability and security. Concealing fencing and barrier supports within natural landscaping or decorative elements helps maintain visual harmony. Use color-matched or treated materials that withstand weather exposure and deter corrosion.Designing access points with built-in locking mechanisms and hidden security hardware minimizes visual clutter and enhances safety.
Incorporate security features early in the construction process, allowing for seamless integration without compromising the coop’s overall appearance. Thoughtful placement of barriers, locks, and protective features ensures that security does not interfere with accessibility or ventilation, maintaining a healthy environment for the chickens while safeguarding them effectively.
Maintenance and Upkeep of the Chicken Coop
Ensuring the cleanliness and structural integrity of your chicken coop is essential for the health and well-being of your flock. Regular maintenance not only extends the lifespan of the coop but also minimizes the risk of disease and pest infestations. A well-maintained coop provides a safe, comfortable environment for chickens to thrive, laying the foundation for productive poultry keeping.Proper upkeep involves routine cleaning, systematic inspections, seasonal tasks, and proactive troubleshooting.
Implementing scheduled maintenance routines can prevent many common problems and promote a hygienic living space for your hens.
Routine Cleaning Procedures and Frequency
Consistent cleaning is vital in controlling ammonia buildup, preventing the spread of parasites, and eliminating bacteria. Establishing a cleaning schedule based on flock size and environmental conditions ensures ongoing hygiene and health.
Daily Tasks
Remove manure, uneaten feed, and soiled bedding to prevent odor accumulation and reduce pest attraction. Check for spilled water or feed that could promote mold growth.
Weekly Tasks
Replace bedding material such as straw or wood shavings. Sweep or scrub the coop floors and perches to remove dust and droppings. Clean waterers and feeders thoroughly to prevent bacterial growth.
Monthly Tasks
Deep clean the entire coop, including walls, vents, and nesting boxes. Disinfect surfaces using a poultry-safe disinfectant, ensuring all areas are sanitized to reduce disease risks.Regular cleaning significantly reduces the likelihood of respiratory issues, parasitic infestations, and bacterial infections, promoting a healthier environment for your chickens.
Inspection Points for Structural Integrity and Repairs
Periodic inspections help identify potential problems before they escalate, safeguarding your flock and preserving the coop’s longevity.
Foundation and Floor
Check for signs of rot, cracks, or shifting. Ensure that the floor is level and that it prevents pests from burrowing inside.
Walls and Roof
Examine for damage, leaks, or loose panels. Verify that roofing materials are intact to prevent water ingress which can cause wood rot or dampness.
Doors and Windows
Ensure hinges and latches operate smoothly. Confirm that openings are secure to keep predators out.
Ventilation and Mesh
Check for tears or rust in mesh panels. Proper ventilation must be maintained to prevent moisture buildup and respiratory issues.Promptly address minor damages such as loose screws or small leaks with appropriate repairs, and consider reinforcing areas that show signs of wear.
Seasonal Maintenance Tasks
Adjusting maintenance routines according to seasonal changes helps protect the coop and optimizes conditions for your chickens.
Spring
Clean and disinfect after winter; inspect and repair any damage caused by snow or ice. Prepare ventilation and shading for warmer months. Add fresh bedding and ensure nesting boxes are clean.
Summer
Increase ventilation and shade to prevent overheating. Check for pest infestations such as mites or flies, and implement control measures. Keep water sources clean and plentiful.
Autumn
Prepare for colder weather by sealing drafts and insulating where necessary. Clean gutters and check roof integrity. Collect and compost fallen leaves or debris from the coop area.
Winter
Ensure that the coop remains draft-free but well-ventilated. Use straw or hay in bedding for insulation. Regularly clear snow and ice from entrances and water sources to avoid freezing.Adopting seasonal routines ensures that your chickens remain comfortable, healthy, and protected against weather-related challenges.
Troubleshooting Common Coop Issues
Addressing issues promptly preserves the health and safety of your flock while preventing minor problems from escalating into serious concerns.
- Pest Infestations (mites, lice, rodents): Regularly inspect nesting boxes and perches. Use appropriate pest control methods, such as diatomaceous earth for bedding or bait stations for rodents. Maintain cleanliness to deter pests.
- Odor and Ammonia Buildup: Increase ventilation, clean droppings frequently, and replace bedding as needed. Ensure proper drainage around the coop to prevent dampness.
- Water Leaks or Dampness: Repair leaks promptly, and elevate the coop if necessary to prevent flooding. Use moisture-resistant flooring materials or seal cracks in walls.
- Structural Damage: Reinforce weakened areas, replace rotted wood, and tighten loose fittings. Regularly test the stability of doors, windows, and fencing.
- Temperature Extremes: Provide shade and ventilation in summer, and insulation or heat sources during winter to maintain a stable temperature inside the coop.
Timely troubleshooting minimizes stress on your chickens and maintains a safe, comfortable environment, contributing to their overall health and productivity.
Last Word

In conclusion, building a chicken coop involves careful planning, material selection, and meticulous construction to ensure safety, comfort, and sustainability. By applying these principles, you will create a resilient environment that promotes healthy flock development and simplifies ongoing maintenance. Your effort will result in a well-designed coop that benefits both your chickens and your overall homestead experience.