Learning how to raise quail offers an excellent opportunity to produce fresh eggs and high-quality meat while engaging in sustainable farming practices. This guide provides a comprehensive overview for beginners interested in establishing a successful quail farming operation, highlighting essential aspects from habitat setup to health management.
Whether you are interested in small-scale poultry farming or exploring a new agricultural venture, understanding the fundamental requirements for raising quail will help you achieve optimal productivity and ensure the well-being of your birds. With proper planning and care, quail farming can become a rewarding and profitable endeavor.
Understanding Quail Farming
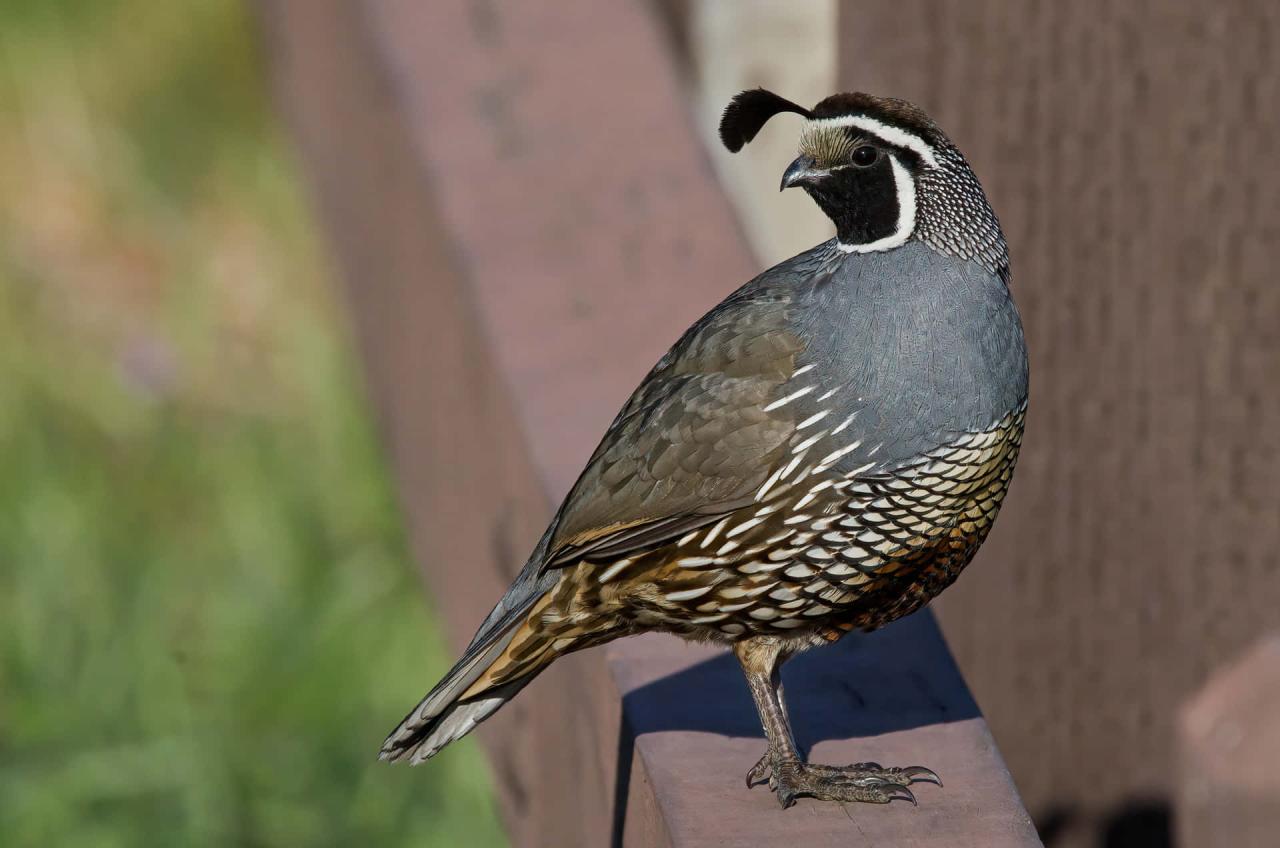
Embarking on quail farming offers a sustainable and rewarding opportunity for both novice and experienced poultry enthusiasts. With their rapid reproduction rates, small space requirements, and high productivity, quails present an efficient way to produce nutritious meat and eggs. Grasping the fundamentals of quail farming is essential for establishing a successful operation that can provide steady income and nutritional benefits over time.
Successful quail farming hinges on understanding the benefits, selecting suitable breeds, and managing their care effectively. This section provides a comprehensive overview of these aspects, equipping new farmers with the knowledge necessary to start and maintain a thriving quail enterprise.
Benefits of Raising Quail for Meat and Eggs
Raising quail offers numerous advantages that make them an attractive choice for small-scale farmers and backyard enthusiasts. Quails are highly efficient converters of feed into meat and eggs, often outperforming larger poultry in terms of productivity relative to their size.
Key benefits include:
- High Egg Production: Quails can lay up to 300 eggs annually per bird, providing a consistent supply of fresh eggs that are rich in protein, vitamins, and minerals.
- Fast Growth Rate: Quails reach maturity and start laying eggs as early as 6 to 8 weeks, enabling quick returns on investment.
- Small Space Requirement: Their compact size allows for intensive farming in limited spaces, making them suitable for urban or small-scale farms.
- Low Maintenance: Quails require minimal space, simple feeding routines, and are relatively disease-resistant, reducing overall care costs.
- Nutritious Meat: Quail meat is lean, tender, and highly nutritious, popular in gourmet cuisine and health-conscious markets.
Overview of Quail Breeds Suitable for Beginners
Choosing the right breed is crucial for beginners to ensure ease of care, productivity, and adaptability to various environments. Different breeds have unique characteristics, egg-laying capacities, and growth patterns.
Below is a detailed overview of some popular beginner-friendly quail breeds:
| Breed | Characteristics | Size | Egg Production (per year) |
|---|---|---|---|
| Coturnix Quail | Hardy, adaptable, good for meat and eggs, docile | 120-150 grams | 200-300 eggs |
| Pharaoh Quail | Fast-growing, prolific layers, easy to handle | 100-120 grams | 180-240 eggs |
| Button Quail | Smaller size, ornamental, less prolific | 50-70 grams | 50-80 eggs |
| Italian Quail | Good egg layers, smaller size, hardy | 100 grams | 150-200 eggs |
Among these, Coturnix and Pharaoh quails are most recommended for beginners due to their resilience, ease of handling, and high productivity. Button quails, while appealing for ornamental purposes, have lower egg yields and require more delicate care, making them suitable for enthusiasts rather than commercial ventures.
Setting Up a Quail Habitat
Establishing a well-designed habitat is fundamental for the health, safety, and productivity of your quail. A properly constructed enclosure not only provides protection from predators and harsh weather but also ensures the birds have enough space to thrive and exhibit natural behaviors. The choice of materials and layout plays a significant role in creating a sustainable and comfortable environment for your quail flock.
An ideal quail habitat combines safety, functionality, and sustainability. It should facilitate easy management, maintain hygiene, and promote the well-being of the birds. Thoughtful planning and attention to detail during setup will result in a healthier, more productive quail farm.
Essential Components of a Safe and Comfortable Quail Enclosure
Designing a secure and comfortable environment for quail involves several key elements that protect the birds while providing sufficient space and amenities.
- Predator-proof fencing: High-security fencing made from galvanized wire mesh with small enough holes (about 1/2 inch) to prevent predators like rats, snakes, or raccoons from entering.
- Ventilation and airflow: Proper ventilation reduces humidity and prevents respiratory issues. Incorporate adjustable vents or windows that can be opened or closed based on weather conditions.
- Shade and shelter: Provide shaded areas using durable, breathable materials to protect quail from direct sunlight and rain, helping to regulate temperature and prevent heat stress.
- Cleaning and drainage: The enclosure should have a smooth and easily cleanable floor with effective drainage to prevent the buildup of moisture and disease-causing bacteria.
- Perches and nesting boxes: Include perching structures and nesting boxes to meet natural behaviors. Nesting boxes should be insulated, private, and accessible for egg collection.
- Feeding and watering stations: Keep feed and water containers elevated or enclosed to prevent contamination and spillage, ensuring clean and accessible resources for the birds.
Constructing or Choosing an Enclosure Using Sustainable Materials
Sustainable construction practices not only benefit the environment but also promote the longevity and safety of the quail habitat. Using eco-friendly, durable materials reduces long-term costs and minimizes ecological impact.
- Recycled wood and bamboo: Use treated or naturally rot-resistant wood, such as bamboo or reclaimed wood, for framing, perches, and nesting boxes. These materials are renewable and biodegradable.
- Galvanized wire mesh: Select galvanized or stainless steel wire mesh for fencing and ventilation covers. These materials resist rust and are safe for poultry, ensuring durability over years of use.
- Natural shading materials: Incorporate shade structures made from locally sourced thatch, bamboo, or recycled fabrics, which provide effective protection from the sun without relying on synthetic products.
- Eco-friendly flooring options: Use compacted earth or recycled gravel combined with organic bedding materials like straw or wood shavings, which are biodegradable and promote good drainage.
- Sustainable paint and sealants: Apply non-toxic, environmentally friendly paints or sealants to wooden components to extend their lifespan without introducing harmful chemicals into the habitat.
Dimensions and Space Requirements for Quail Enclosure
Providing adequate space is crucial for maintaining healthy and stress-free quail. The enclosure dimensions should be tailored to the number of birds, environmental conditions, and management practices. The following table illustrates recommended space allocations to ensure optimal living conditions.
| Number of Quails | Minimum Enclosure Area (square meters) | Per Bird Space (meters squared) |
|---|---|---|
| 10-20 | 4.0 | 0.2 |
| 21-50 | 10.0 | 0.2 |
| 51-100 | 20.0 | 0.2 |
| Over 100 | 50.0 and above | 0.2 |
Providing at least 0.2 square meters per bird ensures they have enough space to move freely, exhibit natural behaviors, and reduce stress levels, which ultimately promotes better health and egg production.
Feeding and Nutrition
Providing proper nutrition is fundamental to achieving healthy growth, high productivity, and overall well-being of quail. A balanced diet tailored to each stage of development ensures optimal feathering, bone development, and egg production. The right feeding strategy minimizes health issues and enhances the economic viability of quail farming, making it a critical component of successful management.
Understanding the nutritional needs at various growth stages allows farmers to formulate or select appropriate feeds and supplements, ensuring that quail receive essential nutrients at the right time. This comprehensive approach not only promotes growth efficiency but also reduces feed wastage and costs.
Types of Feed Needed at Various Growth Stages
Quail require different nutrient compositions as they progress from hatchlings to adult layers or breeders. The dietary needs evolve to support rapid growth in the early stages, maintenance in maturity, and high productivity in laying phases. Proper stage-specific feeding enhances development, immune function, and reproductive performance.
- Starter Feed (0-4 weeks): Rich in protein (24-28%) to support rapid growth and feather development. Typically formulated with high-quality grains, vitamins, and minerals.
- Grower Feed (5-6 weeks): Contains moderate protein levels (20-22%) to sustain steady growth without excessive fat deposition. Emphasizes balanced energy and nutrients.
- Layer or Breeder Feed (from 6 weeks onward): Designed with lower protein (16-18%) but enriched with calcium and vitamin D to support eggshell formation and reproductive health.
- Maintenance Feed: For mature, non-laying quail, with balanced nutrients to sustain health without promoting excessive weight gain.
Nutritious Supplements and Their Purposes
Supplements play a vital role in ensuring quail receive all essential nutrients that may be insufficient in regular feed. Incorporating specific supplements can improve growth rates, immunity, and productivity.
- Grit: Provides insoluble minerals necessary for digestion, especially for birds without access to natural grit sources. It aids in grinding food in the gizzard.
- Vitamin Supplements: Such as vitamin A, D, E, and complex B vitamins to bolster immune function, reproductive health, and overall vitality.
- Mineral Mixes: Comprise calcium, phosphorus, and trace minerals, essential for eggshell strength and bone development.
- Probiotics: Promote healthy gut flora, improving nutrient absorption and reducing digestive disorders.
- Electrolytes: Support hydration and recovery during stress or illness episodes.
Example Feeding Schedule for Different Age Groups
Implementing a structured feeding schedule ensures quail receive appropriate nutrients at each stage of development, optimizing growth, health, and productivity. The following table illustrates an example daily feeding routine aligned with age groups.
| Age Group | Time of Day | Feed Type | Quantity/Day | Notes |
|---|---|---|---|---|
| 0-4 weeks (Chicks) | Morning & Evening | Starter Feed | Approx. 10-15 grams per chick | Fresh, clean water available at all times |
| 5-6 weeks (Growers) | Morning & Evening | Grower Feed | 20-25 grams per bird | Introduce grit for digestion |
| 6 weeks and older (Layers/Breeders) | Multiple times | Layer or Breeder Feed | 25-30 grams per bird | Supplement with calcium sources for egg production |
| Mature, non-laying | Twice daily | Maintenance Feed | 20 grams per bird | Ensure fresh water and mineral balance |
Maintaining consistency with this feeding schedule, along with observing bird health and growth rates, can significantly enhance the success of quail farming operations. Adjustments should be based on farm-specific conditions, breed characteristics, and management goals.
Watering and Hydration

Ensuring that quails have constant access to clean, fresh water is fundamental to maintaining their health, productivity, and overall well-being. Proper hydration supports vital physiological functions, aids in digestion, and helps prevent common health issues associated with dehydration. Inadequate water intake can lead to decreased egg production, weakened immune response, and increased susceptibility to disease, making diligent water management an essential aspect of successful quail farming.Providing a continuous supply of clean water not only sustains the quails but also contributes to their comfort and reduces stress within the habitat.
It is vital to establish reliable systems and routines that guarantee freshness and cleanliness, thereby promoting optimal health and maximizing productivity.
Automatic Watering Systems and Cleaning Routines
Implementing automatic watering systems simplifies the task of providing fresh water while ensuring consistency and reducing labor. These systems are designed to deliver water continuously through nipple drinkers or floats, minimizing spillage and contamination. Proper setup and regular maintenance of these systems are crucial for their effectiveness and longevity.Automatic watering systems typically consist of a water source—such as a tank or main line—connected to a network of nipples or sippers positioned within the quail habitat.
These components should be installed at appropriate heights to facilitate easy access for the quails and to prevent contamination from bedding or droppings. Regular inspection of the system ensures that all nipples function correctly, and any leaks or blockages are promptly addressed.Maintaining optimal water quality involves establishing strict cleaning routines. Daily checks should be conducted to remove any debris or droppings around the drinkers, and the system should be flushed periodically to prevent mineral buildup or algae growth.
In addition, the water source must be cleaned and refilled regularly, ideally every 24 hours, to prevent bacterial growth.
Step-by-Step Guide to Maintaining Water Quality
Maintaining clean and fresh water for quails requires a structured approach that emphasizes hygiene and system efficiency. The following steps Artikel a comprehensive routine:
- Inspect Water Sources Daily: Examine all water containers, nipples, and pipes to ensure they are functioning correctly and free from debris or buildup.
- Clean Drinkers Regularly: Remove and scrub water containers, using warm water and a mild disinfectant if necessary, at least once every 2-3 days to prevent biofilm formation.
- Flush Automatic Systems: Conduct a thorough flushing of the entire watering network weekly, using clean water to clear away mineral deposits and algae.
- Replace Water Daily: Empty and refill water containers each day, especially during hot weather or high temperatures, to prevent stagnation and bacterial proliferation.
- Monitor Water Temperature and Quality: Ensure the water remains cool and palatable. Avoid using untreated or stagnant water, as it can promote disease transmission.
- Maintain Proper Water Pressure: Adjust the pressure of automatic systems to prevent leaks or overflow, which can contaminate the habitat or cause spillage.
- Record Maintenance Activities: Keep a log of inspections, cleaning schedules, and any issues encountered. This helps in identifying patterns and ensuring consistent water quality management.
“Consistent access to clean water is not just a necessity; it is the foundation of healthy, productive quail farming.” — Expert avian veterinarian.
Raising Quail from Eggs
Successfully raising quail from eggs is a rewarding aspect of quail farming that requires careful attention to incubation conditions and handling practices. Proper management during incubation and hatching ensures higher hatch rates and healthy, vigorous chicks that will grow into productive adult quails.
Understanding the key steps involved in incubating eggs, checking fertility, and ensuring optimal hatch conditions is essential for any aspiring quail farmer. This process involves precise control of temperature and humidity, regular candling to monitor embryo development, and gentle handling to prevent damage, all of which contribute to a successful hatch.
Incubating Quail Eggs
Incubation is a critical phase in raising quail from eggs, requiring consistent environmental control to mimic natural conditions. The incubation process typically spans 16 to 18 days, during which maintaining the right temperature and humidity levels is vital for embryo development and hatch success.
For quail eggs, the ideal incubation temperature is around 99.5°F (37.5°C), with a relative humidity of approximately 55-60%. These parameters facilitate proper embryo growth and prevent issues such as mold or dehydration. It is important to use a reliable incubator equipped with temperature and humidity controls, and to regularly monitor and adjust these settings to ensure stability throughout the incubation period.
Proper ventilation within the incubator helps regulate oxygen levels and remove excess carbon dioxide, supporting healthy embryo development. Turning the eggs multiple times daily, about 3-5 times, prevents the embryo from sticking to the shell and promotes even warming. After about 14 days, humidity may be increased slightly to assist hatchling emergence.
Candling Eggs to Check Fertility and Embryo Development
Candling eggs is an essential practice for assessing fertility, embryo growth, and identifying non-viable eggs early enough to remove them from the incubation process. Regular candling can improve hatch rates by allowing for timely interventions.
To candling, a bright light source is used to illuminate the egg’s interior in a dark room. The following steps Artikel an effective candling procedure:
- Hold the egg carefully in your hand or place it on a non-reflective surface to prevent accidental drops or damage.
- Use a small, bright flashlight or specialized candling device, ensuring the light is strong enough to penetrate the eggshell.
- Position the light source directly behind the egg in a dark environment to maximize visibility.
- Look for signs of fertility such as a network of blood vessels and an opaque, developing embryo, which appears as a dark spot.
- In early stages (day 5-7), identify clear eggs lacking veins or embryo development, indicating infertility or early death.
- In later stages (day 10-14), observe the movement and growth of the embryo, ensuring it is developing normally.
Preventing Egg Damage and Ensuring Successful Hatching
Protecting eggs from damage during incubation and handling is crucial for maximizing hatchability. Cracks, chips, or excessive movements can compromise embryo development and lead to failure.
To prevent egg damage, consider the following tips:
- Handle eggs gently, supporting their weight from the sides rather than the pointed end to avoid cracking.
- Use only clean, uncracked eggs for incubation. Eggs with visible defects should be discarded to prevent contamination.
- Maintain a stable incubation environment, avoiding sudden temperature or humidity fluctuations that can cause eggs to crack or dehydrate.
- Ensure the incubator is clean and disinfected before setting eggs to reduce the risk of bacterial contamination.
- Allow eggs to rest at room temperature for a few hours if transferred from cool storage, ensuring they are at an appropriate temperature before incubation.
- Maintain proper turning schedules and avoid excessive handling during the incubation period, especially in the last days before hatch.
Creating a calm, stable environment and handling eggs with care significantly improve the chances of successful hatching and healthy chicks.
Managing Quail Health

Effective management of quail health is essential to ensure a productive and disease-free flock. Vigilant observation, preventative measures, and prompt intervention form the foundation of maintaining robust quail populations. Understanding common health issues and implementing proper biosecurity protocols can significantly reduce the risk of outbreaks and improve the overall well-being of your birds.
Healthy quail are more resilient to environmental stresses and better able to maximize growth, egg production, and overall vitality. As a responsible farm manager or hobbyist, familiarity with common ailments, symptoms, and appropriate responses is crucial to sustaining a thriving quail operation. This section provides comprehensive guidance on identifying health issues, implementing biosecurity measures, and troubleshooting common problems to support your quail’s health management strategies.
Common Health Issues and Symptoms
Recognizing early signs of illness is vital for effective treatment and prevention of disease spread within a flock. Quail can be susceptible to various health problems, often manifesting through specific symptoms that serve as warning signals for owners or caretakers.
- Respiratory Infections: Symptoms include nasal discharge, sneezing, coughing, labored breathing, and decreased activity.
- Coccidiosis: Signs involve drooping wings, diarrhea (sometimes bloody), weight loss, and lethargy. It is caused by protozoan parasites affecting the intestinal lining.
- Pasteurellosis (Fowl Cholera): Characterized by swollen wattles, nasal discharge, and sudden death in severe cases.
- External Parasites: Mites and lice may cause feather loss, itching, irritation, and anemia.
- Egg Binding: Females may exhibit straining, lethargy, and swollen abdomen when unable to lay eggs.
Monitoring these symptoms diligently allows for early treatment and minimizes mortality rates. Regular health checks, observation of behavior, and proper record-keeping are essential components of health management.
Biosecurity Measures to Prevent Disease Outbreaks
Implementing stringent biosecurity protocols is critical in preventing the introduction and spread of infectious agents within your quail flock. These measures create a barrier against pathogens and maintain a safe environment for the birds.
- Controlled Access: Limit visitor and personnel access to the housing area. Use footbaths with disinfectant and change footwear before entering the habitat.
- Proper Quarantine: Isolate new or sick birds from the main flock for at least 30 days to monitor health status and prevent disease transmission.
- Sanitation and Disinfection: Regularly clean and disinfect cages, feeders, waterers, and equipment using suitable disinfectants effective against avian pathogens.
- Management of Waste: Proper disposal of manure, dead birds, and contaminated bedding prevents pathogen buildup and minimizes environmental contamination.
- Rodent and Pest Control: Maintain pest-proof housing and eliminate rodents and insects that can carry diseases.
Maintaining a biosecure environment requires consistent effort and vigilance, but it significantly reduces the risk of costly disease outbreaks and safeguards your investment.
Troubleshooting Chart for Common Health Problems
Addressing health issues promptly involves recognizing symptoms and applying effective remedies. The following chart offers guidance on common problems, potential causes, and recommended treatments:
| Health Issue | Symptoms | Likely Cause | Remedy |
|---|---|---|---|
| Respiratory Distress | Sneezing, nasal discharge, labored breathing | Infectious bronchitis, bacterial infection, or dust inhalation | Improve ventilation, administer antibiotics if bacterial, and remove dust sources |
| Diarrhea or Bloody Droppings | Watery stool, blood in feces, dehydration | Coccidiosis or bacterial infection | Administer anticoccidials (such as toltrazuril) and maintain hydration; consult vet for antibiotics |
| Feather Loss and Itching | Disheveled feathers, scratching, irritation | External parasites like mites or lice | Apply approved insecticides, clean and disinfect housing thoroughly |
| Swollen Wattle or Comb | Swelling, redness, difficulty breathing | Pasteurellosis or other bacterial infections | Veterinary diagnosis, antibiotics, and supportive care |
| Egg Binding | Lethargy, abdominal swelling, straining | Calcium deficiency, obesity, or stress | Provide calcium supplements, warm bath, and gentle assistance if necessary |
Maintaining detailed health records, observing daily behaviors, and consulting avian veterinarians when needed are the best strategies for managing health issues effectively and ensuring the longevity of your quail flock.
Breeding and Reproduction
Effective breeding and reproduction strategies are essential for maintaining a healthy, productive quail flock. Selecting the right breeding pairs, managing breeding cycles, and understanding the developmental timelines of chicks are pivotal to successful quail farming. Proper management not only enhances reproductive success but also ensures genetic diversity and disease control within the flock.Breeding and reproduction in quail involve carefully planned pairings and cycle management to optimize hatchability and chick quality.
It requires attention to the genetic traits, health status, and environmental conditions to produce high-quality offspring and sustain a productive farm operation.
Selecting Breeding Pairs
Choosing suitable breeding pairs is fundamental for genetic improvement and maintaining healthy stock. The selection process should prioritize birds with desirable traits, such as high egg production, strong immune systems, and good temperament. It is important to assess the physical health, genetic background, and lineage of potential breeders to avoid inbreeding, which can lead to health issues and reduced vitality.Healthy, vigorous birds with a balanced diet and proper housing are more likely to produce viable eggs and healthy chicks.
Selecting pairs that have demonstrated consistent reproductive performance over several breeding cycles is ideal. Regularly monitoring their health and reproductive behavior helps identify the most suitable individuals for breeding.
Controlling Breeding Cycles
Managing the reproductive cycle of quail is critical to ensuring that breeding occurs at optimal times and that resources are efficiently allocated. Quails are known for their prolific laying habits, typically producing eggs daily during the peak season. To control breeding cycles, farmers can manipulate environmental factors such as light and temperature.Implementing a light schedule of approximately 14-16 hours of light per day encourages consistent egg production and can synchronize breeding cycles.
Conversely, reducing light exposure to about 8-10 hours can suppress reproductive activity, which is useful during the off-season or for rest periods. Maintaining stable temperature and humidity levels also supports regular reproductive behavior.
Controlling the breeding cycle ensures optimal hatch rates, reduces stress, and allows for better planning of chick production.
Breeding Timelines, Incubation, and Chick Development
Understanding the timelines associated with quail reproduction is key to planning and managing breeding operations effectively. The following table summarizes typical timelines for breeding, incubation, and chick growth stages:
| Stage | Duration | Details | Notes |
|---|---|---|---|
| Breeding and Egg Laying | Approximately 6-8 weeks | Hens lay eggs almost daily, with peak laying around 4-6 weeks of age | Regular light and feeding optimize laying periods |
| Incubation | 17-18 days | Eggs are incubated at 99.5°F (37.5°C) with 55-60% humidity | Turning eggs twice daily improves hatchability |
| Chick Development | 0-4 weeks | Chicks hatch fully covered in down, start feeding and drinking within hours | Proper temperature and humidity are critical during this stage |
| Juvenile Growth | 4-8 weeks | Chicks develop feathers, gain size, and become sexually mature | Gradual transition to adult diet recommended |
By adhering to these timelines, quail farmers can better coordinate breeding activities, optimize hatch rates, and ensure healthy chick development, ultimately leading to a sustainable and productive operation.
Housing Maintenance and Cleaning
Maintaining a clean and hygienic environment for quails is essential to promote their health, optimize productivity, and prevent the spread of diseases. Proper housing maintenance not only extends the lifespan of the enclosure but also ensures that the quails remain comfortable and stress-free. A systematic approach to cleaning and disinfecting can significantly reduce the risk of infections and improve overall farm management.
Effective cleaning protocols involve routine removal of waste, regular disinfection of enclosures, and scheduled maintenance checks. Implementing a well-organized cleaning schedule helps in maintaining consistent hygiene standards, minimizing the chances of contamination, and ensuring a safe habitat for the quails.
Routine Cleaning Protocols to Ensure Hygiene
Consistent cleaning routines are the backbone of a healthy quail farming operation. Daily tasks should include removing soiled bedding, uneaten feed, and visible waste from the enclosures. It is crucial to inspect the environment for any signs of mold, pests, or damage that could compromise the health of the birds. Ventilation systems and feeders should also be cleaned regularly to prevent the buildup of bacteria and mold.
Deep cleaning should be performed weekly to thoroughly sanitize the housing. This involves removing all bedding, cleaning surfaces with appropriate cleaning agents, and inspecting for structural issues. Maintaining dry, clean bedding reduces ammonia levels, which can cause respiratory problems in quails.
Procedures for Disinfecting Enclosures without Harming Quail
Disinfection is vital to eliminate pathogens without harming the quails or compromising their environment. Use disinfectants that are specifically formulated for poultry housing and ensure they are approved by relevant agricultural authorities. Before applying disinfectants, remove all bedding, feed, and water sources, and thoroughly clean surfaces with soap and water to remove organic matter that can neutralize disinfectants.
Always rinse surfaces with clean water after disinfecting and allow adequate drying time before reintroducing the quails.
Natural disinfectants like a diluted vinegar solution or hydrogen peroxide can be used for routine sanitation, provided they are applied correctly. Avoid using harsh chemicals such as bleach directly in enclosures, unless specifically recommended and properly diluted, to prevent respiratory irritation or poisoning.
Disinfecting should be scheduled after deep cleaning routines and whenever there is an outbreak of illness or signs of disease to ensure a pathogen-free environment.
Cleaning Schedule Organization
Establishing a clear cleaning schedule ensures that maintenance tasks are performed consistently and effectively. The following table provides an example of a weekly routine for housing maintenance and cleaning:
| Task | Frequency | Details |
|---|---|---|
| Remove soiled bedding and waste | Daily | Carefully collect and dispose of litter, droppings, and uneaten feed to prevent ammonia buildup. |
| Clean feeders and waterers | Daily | Wash with warm water and a mild disinfectant to prevent bacterial growth. |
| Deep clean enclosures | Weekly | Remove all bedding, scrub surfaces with soap and disinfectant, rinse thoroughly, and dry before adding fresh bedding. |
| Disinfect surfaces and equipment | Weekly or after outbreaks | Apply approved disinfectants, ensuring all areas are covered and allowed to dry completely. |
| Inspect and repair housing structures | Monthly | Check for damage, pests, or wear and tear, and carry out necessary repairs to prevent escapes and injuries. |
Adhering to this schedule helps in maintaining a hygienic environment, reducing disease prevalence, and promoting optimal quail health and productivity.
Harvesting and Marketing
Effective harvesting and strategic marketing are essential components of a successful quail farming operation. Proper methods ensure humane treatment of the birds and maintain the quality of eggs and meat, while innovative marketing strategies help farmers maximize their income by reaching broader audiences. Understanding these aspects can significantly influence the profitability and sustainability of your quail farm.Harvesting quail products in a humane and efficient manner is vital to preserve their quality and ensure ethical practices.
Additionally, branding and selling these products—whether locally or online—require thoughtful strategies to attract customers and build a reputable business. This section explores methods for humane harvesting of eggs and meat, along with effective branding and marketing techniques.
Humane Harvesting of Eggs and Meat
The humane collection of quail eggs and the slaughtering process for meat must prioritize bird welfare while maintaining product quality. Proper handling minimizes stress and potential injuries, leading to better consumer acceptance and animal welfare standards. For egg harvesting, gentle collection techniques involve routinely checking nesting areas and using soft, careful movements to avoid disturbing the birds excessively. Collect eggs multiple times daily to prevent damage and ensure freshness.
It is crucial to store eggs in clean, well-ventilated containers and at appropriate temperatures to maintain quality.When it comes to meat harvesting, slaughtering should adhere to ethical standards and local regulations. The process typically involves humane euthanasia methods, such as cervical dislocation or stunning, followed by swift processing to reduce suffering. Ensuring cleanliness during slaughter and post-mortem handling minimizes contamination risks and preserves the meat’s quality.
Branding and Selling Quail Products
A strong branding strategy enhances the visibility and perceived value of your quail products, opening avenues for sales both locally and online. Developing a consistent brand identity—through logos, packaging, and messaging—helps build trust and loyalty among customers.To reach local markets effectively, farmers can participate in farmers’ markets, community events, or establish partnerships with local grocery stores and restaurants. For online sales, creating a dedicated website or leveraging social media platforms allows direct interaction with consumers, providing detailed product information and fostering customer relationships.Strategies for successful marketing include storytelling around your farm’s practices, emphasizing quality, freshness, and humane treatment.
Educating consumers about the health benefits of quail eggs and meat can also boost demand.
Packaging and Presentation Options
Presentation plays a significant role in attracting customers and ensuring product safety and freshness. Well-designed packaging communicates quality and professionalism, which can differentiate your products in a competitive market.Consider the following packaging and presentation options:
- Recyclable cartons: Use sturdy, eco-friendly cartons specifically designed for eggs, with clear labeling of size, weight, and farm branding.
- Vacuum-sealed packs: For quail meat, vacuum sealing extends shelf life and maintains freshness, adding a professional touch.
- Clear plastic containers: Transparent containers allow customers to see the product directly, enhancing trust and appeal.
- Customized labels: Incorporate your farm’s logo, contact details, and product information, along with nutritional benefits or farm story snippets.
- Gift packs: Offer curated sets of eggs and meat, attractively arranged in baskets or boxes with decorative wrapping for special occasions.
Using high-quality packaging not only preserves your quail products but also signals professionalism and care, encouraging repeat business and customer referrals.
Summary

In conclusion, mastering how to raise quail involves careful planning, consistent management, and a thorough understanding of each stage of their development. By following best practices in habitat setup, nutrition, health management, and marketing, you can enjoy a successful and sustainable quail farming experience that yields high-quality eggs and meat while contributing positively to your local community.